이전 소개 포스트에 이어서 예제를 직접 만들어 보겠습니다.
예제는 gRPC 홈에 있는 quick start의 예제의 proto 파일을 그대로 사용했으며, Rust와 Flutter code는 직접 생성해봤습니다.
다음과 같은 절차로 진행합니다.
- 준비물
- proto file 작성
- Rust로 gRPC 공통 library 작성
- Rust로 gRPC server 작성
- Rust로 gRPC client 작성
- Rust Server + Rust Client 연동 테스트
- Flutter로 gRPC client 작성
- Rust Server + Flutter Client 연동 테스트
- 마무리하며
1. 준비물
protoc 설치
protoc는 gRPC에서 사용하는 protocol buffer의 compiler다.
Windows 환경
chocolatey를 이용해서 protoc 를 설치한다.
choco install protocmacOS 환경
brew install protobuf2. proto file 작성 (protos/helloworld.proto)
syntax = "proto3";

package helloworld;

service Greeter {
  rpc SayHello (HelloRequest) returns (HelloResponse);
}

message HelloRequest {
  string name = 1;
}

message HelloResponse {
  string message = 1;
}
3. Rust로 gRPC 공통 library 작성
Rust library 프로젝트 생성
cargo new --lib helloworld_grpc_common_rsCargo.toml 수정 (helloworld_grpc_common_rs/Cargo.toml)
...
[dependencies]
prost = "0.12.1"
tokio = { version = "1.32.0", features = ["rt-multi-thread", "macros"] }
tonic = "0.10.1"

[build-dependencies]
tonic-build = { version = "0.10.1", features = ["prost"] }
build.rs 작성 (helloworld_grpc_common_rs/build.rs)
gRPC를 지원하는 다른 언어들과 다르게 Rust의 경우 코드 생성과정이 필요없이 빌드 아래와 같이 build.rs를 작성하면 앱 빌드시 proto 파일을 함께 compile하면서 빌드가 됩니다.
생성된 helloworld module은 gRPC server와 client에서도 모두 사용되므로 공용 library화하였습니다.
fn main() -> Result<(), Box<dyn std::error::Error>> {
    tonic_build::compile_protos("../protos/helloworld.proto")?;
    Ok(())
}
lib.rs 작성 (helloworld_grpc_common_rs/src/lib.rs)
pub mod helloworld {
    tonic::include_proto!("helloworld");
}
4. gRPC server in Rust
cargo new helloworld_grpc_server_rsCargo.toml 수정 (helloworld_grpc_server_rs/Cargo.toml)
...
[dependencies]
tokio = { version = "1.32.0", features = ["rt-multi-thread", "macros"] }
tonic = "0.10.1"
helloworld_grpc_common_rs = { path = "../helloworld_grpc_common_rs" }
main.rs 작성 (helloworld_grpc_server_rs/src/main.rs)
use helloworld_grpc_common_rs::helloworld::greeter_server::GreeterServer;
use helloworld_grpc_common_rs::helloworld::{greeter_server::Greeter, HelloRequest, HelloResponse};
use tonic::{transport::Server, Request, Response, Status};

#[derive(Default)]
pub struct MyGreeter {}

#[tonic::async_trait]
impl Greeter for MyGreeter {
    async fn say_hello(
        &self,
        request: Request<HelloRequest>,
    ) -> Result<Response<HelloResponse>, Status> {
        let name = request.get_ref().name.clone();
        let message = format!("Hello, {}!", name);

        let response = HelloResponse { message };

        Ok(Response::new(response))
    }
}

#[tokio::main(flavor = "multi_thread")]
async fn main() -> Result<(), Box<dyn std::error::Error>> {
    let addr = "127.0.0.1:8080".parse()?;
    let greeter = MyGreeter::default();

    println!("Server listening on {}", addr);

    Server::builder()
        .add_service(GreeterServer::new(greeter))
        .serve(addr)
        .await?;

    Ok(())
}
5. Rust로 gRPC client 작성
client를 위한 rust project 생성
cargo new helloworld_grpc_client_rsCargo.toml 수정 (helloworld_grpc_client_rs/Cargo.toml)
...
[dependencies]
tonic = "0.10.0"
tokio = { version = "1.32.0", features = ["rt-multi-thread", "macros"] }
helloworld_grpc_common_rs = { path = "../helloworld_grpc_common_rs" }
main.rs 수정 (helloworld_grpc_client_rs/src/main.rs)
use helloworld_grpc_common_rs::helloworld::greeter_client::GreeterClient;
use helloworld_grpc_common_rs::helloworld::HelloRequest;

#[tokio::main]
async fn main() -> Result<(), Box<dyn std::error::Error>> {
    let mut client = GreeterClient::connect("http://127.0.0.1:8080").await?;

    let request = tonic::Request::new(HelloRequest {
        name: "Tonic".into(),
    });

    let response = client.say_hello(request).await?;

    println!("RESPONSE={:?}", response);

    Ok(())
}
6. Rust Server + Client 연동 테스트
Rust 서버를 실행합니다.
cargo run

Server listening on 127.0.0.1:8080
Rust client를 실행하면 아래와 같이 출력되면 정상작동하는 것입니다.
cargo run
Finished dev \[unoptimized + debuginfo\] target(s) in 0.06s
Running `target/debug/helloworld_grpc_client_rs`
RESPONSE=Response { metadata: MetadataMap { headers: {"content-type": "application/grpc", "date": "Sun, 24 Sep 2023 07:44:53 GMT", "grpc-status": "0"} }, message: HelloResponse { message: "Hello, Tonic!" }, extensions: Extensions }
7. Flutter로 gRPC client 작성
Flutter 프로젝트 생성
flutter create helloworld_grpc_client_flutter관련 library 추가
cd helloworld_grpc_client_flutter
flutter pub add protobuf grpc
Flutter용 gRPC client code 생성
cd ..
mkdir -p helloworld_grpc_client_flutter/lib/generated
protoc -I protos/helloworld.proto --dart_out=grpc:helloworld_grpc_client_flutter/lib/generated
Greeter widget 추가 (helloworld_grpc_client_flutter/lib/greeter.dart)
이 위젯은 Greet, Reset 버튼과 Message 텍스트 박스가 있고, Greet을 누르면 Rust gRPC와 통신해서 결과를 받아오고 받아온 메시지를 Message 텍스트 박스에 counter와 함께 표시합니다. Reset 버튼은 counter와 message를 초기화합니다.
import 'package:flutter/material.dart';
import 'package:grpc/grpc.dart';

import '/generated/helloworld.pbgrpc.dart';

class GreeterWidget extends StatefulWidget {
  const GreeterWidget({super.key});

  @override
  State<GreeterWidget> createState() => _GreeterWidgetState();
}

class _GreeterWidgetState extends State<GreeterWidget> {
  var counter = 0;
  var message = "None";

  @override
  Widget build(BuildContext context) {
    return Column(
      children: [
        TextButton(
          onPressed: _onPressed,
          child: const Text('Greet'),
        ),
        Text('$counter: response: $message'),
        TextButton(
          onPressed: _onResetPressed,
          child: const Text('Reset'),
        ),
      ],
    );
  }

  Future<void> _onPressed() async {
    final channel = ClientChannel(
      '127.0.0.1',
      port: 8080,
      options: const ChannelOptions(credentials: ChannelCredentials.insecure()),
    );

    final stub = GreeterClient(
      channel,
      options: CallOptions(timeout: const Duration(seconds: 30)),
    );

    try {
      final response = await stub.sayHello(
        HelloRequest()..name = 'Flutter',
      );

      debugPrint('Response from server: ${response.message}');
      setState(() {
        counter += 1;
        message = response.message;
      });
    } catch (e) {
      debugPrint('Error: $e');
    } finally {
      await channel.shutdown();
    }
  }

  void _onResetPressed() {
    setState(() {
      counter = 0;
      message = "None";
    });
  }
}
main.dart 수정 (helloworld_grpc_client_flutter/lib/main.dart)
_MyHomePageState 안의 Column 에 GreeterWidget()을 추가합니다.
...
import '/greeter.dart';
...
class _MyHomePageState extends State<MyHomePage> {
...
  @override
  Widget build(BuildContext context) {
...
    return Scaffold(
...
      body: Center(
...
        child: Column(
...
          children: <Widget>[
...
            const GreeterWidget(),
          ],
...
DebugProfie.entitlements 및 Release.entitlements 파일 수정 (helloworld_grpc_client_flutter/macos/Runner/DebugProfile.entitlements) (macOS)
아래는 macOS에서 실행시, network 연결을 허용하기 위해서 두개의 entitlements 파일에 아래의 내용을 추가합니다.
    <key>com.apple.security.network.client</key>
    <true/>
8. Rust Server + Flutter Client 연동 테스트
Rust 서버는 이미 실행되어 있으니, Flutter 클라이언트만 실행합니다. macOS 또는 Windows에서 실행하면 각 OS에 맞는 Flutter desktop application이 실행됩니다.
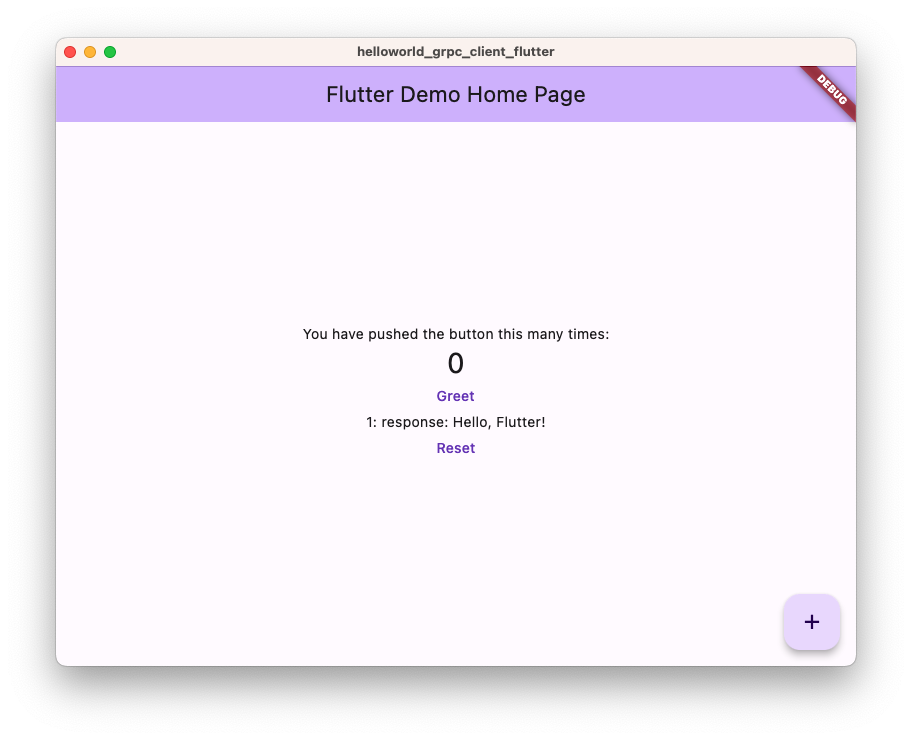
Greet버튼을 탭하면 버튼 밑에 메시지가 출력됩니다. 메시지는 Rust gRPC 서버가 생성해준 메시지입니다.
cd helloworld_grpc_client_flutter
flutter run
macOS에서 실행한 화면입니다. Greet 버튼을 누르면 1: response: Hello, Flutter!로 출력됩니다.
9. 마무리하며
지금까지 Rust 기반의 gRPC 서버, 클라이언트, 그리고 Flutter 기반의 gRPC 클라이언트를 작성해보았고, 상호 연동해서 동작하는 것을 해보았습니다.
FFI와의 장단점이 있으므로, 판단해보시고 프로젝트에 잘 활용바랍니다.


